
Table of Contents:
- Choosing the Right Rubber Pavers for Concrete Installation
- Essential Tools and Materials for Rubber Paver Installation
- Preparing Your Concrete Surface for Rubber Paver Installation
- Step-by-Step Rubber Paver Installation Guide
- Finishing Touches and Edge Solutions
- Maintenance and Troubleshooting Your Rubber Paver Installation
- Frequently Asked Questions
- Transform Your Concrete Space with Professional-Grade Rubber Pavers
Concrete patios are cold, hard, and unforgiving surfaces that punish every step and make outdoor spaces feel more like industrial zones than comfortable living areas. But there's a solution most homeowners don't know about: how to install rubber pavers over existing concrete to create a comfortable, safe, and attractive outdoor space.
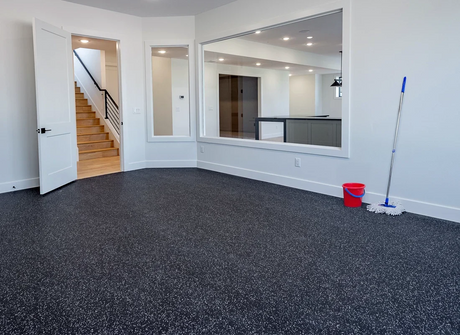
Installing rubber pavers transforms concrete surfaces into cushioned, slip-resistant areas perfect for patios, pool decks, walkways, and outdoor entertainment spaces. The rubber material provides natural shock absorption, reduces fatigue during extended standing, and offers superior traction in wet conditions compared to traditional hard surfaces.
However, despite what you might think, rubber paver installation over concrete is actually more straightforward than traditional paving methods. Unlike concrete or stone pavers that require extensive excavation, base preparation, and heavy lifting, rubber pavers can be installed directly over existing concrete with basic tools and moderate DIY skills.
This comprehensive guide walks you through every step of the process, from selecting the right rubber pavers for your specific application to the final finishing touches that create professional-looking results. You'll learn about proper surface preparation, adhesive selection, installation techniques, and maintenance strategies that ensure your DIY rubber paver patio performs well for decades. According to performance data from quality manufacturers, quality rubber pavers with high-grade binding agents can perform well for 20+ years when properly installed, making this a smart long-term investment for your outdoor space.
The process involves acclimating materials, preparing the concrete surface, applying appropriate adhesive, and systematically laying pavers with proper alignment and spacing. While professional installation costs can range from $3 to $15 per square foot including materials and labor, DIY installation significantly reduces these costs while giving you complete control over the quality and timeline.
Choosing the Right Rubber Pavers for Concrete Installation
Selecting appropriate rubber pavers for your concrete installation determines both the installation method and long-term performance of your project. The most critical decision involves thickness selection, which directly impacts whether you'll use adhesive or loose-laid installation methods.
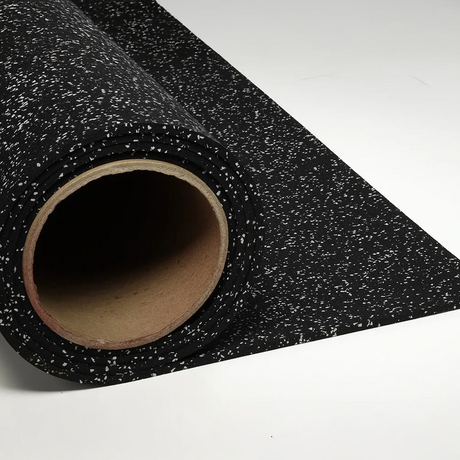
Rubber pavers are available in two main thicknesses: 1 inch for concrete installation with adhesive, and 1-3/4 inch for loose-laid applications over concrete or crushed stone bases. The 1-inch thickness works best for permanent installations where you want the pavers bonded directly to the concrete surface. These thinner pavers require adhesive but create a lower profile transition and more stable walking surface.
As a commercial fitness flooring distributor, we've seen the importance of proper thickness selection - the 1-inch pavers work best for permanent concrete installations while thicker options are better for temporary or removable applications. The 1-3/4 inch pavers can be installed without adhesive using the interlocking edges to create a stable surface that remains removable if needed.
Standard rubber paver dimensions are typically 7 7/8" L x 6 3/8" W with thickness options of 7/8" or 1 3/4", according to industry specifications. These dimensions create manageable pieces for DIY installation while providing efficient coverage. The rectangular shape allows for various laying patterns including running bond, herringbone, or basket weave designs.
Interlocking rubber pavers installation offers significant advantages for DIY projects. Interlocking edges eliminate the need for adhesive in many applications, making DIY installation feasible even for beginners. The interlocking mechanism uses molded tabs and slots along each edge that connect neighboring pavers, distributing load across multiple pieces and preventing individual paver movement.
Material quality varies significantly among rubber paver manufacturers. High-grade binding agents create stronger molecular bonds within the rubber compound, resulting in better durability and weather resistance. Look for pavers manufactured using vulcanized rubber processes, which create more durable products with better dimensional stability. Recycled content pavers can offer good value, but verify the percentage of post-consumer versus post-industrial content, as this affects both quality and environmental benefits.
| Feature | 1-Inch Pavers (Adhesive) | 1-3/4 Inch Pavers (Loose-Laid) |
|---|---|---|
| Installation Method | Requires polyurethane adhesive | Interlocking edges, no adhesive needed |
| Durability | Permanent bond, extremely stable | Stable but may shift over time |
| Removal/Replacement | Difficult, requires adhesive removal | Easy individual paver replacement |
| Cost | Lower material cost, adhesive expense | Higher material cost, no adhesive needed |
| Best Applications | High-traffic patios, permanent installations | Pool decks, seasonal applications |
| Weather Resistance | Excellent with proper adhesive | Good, relies on interlocking system |
Color and texture options affect both aesthetics and performance. Darker colors absorb more heat and may become uncomfortable in direct sunlight, while textured surfaces provide better traction but can be more difficult to clean. Consider the specific location's sun exposure, intended use, and maintenance preferences when selecting color and texture combinations.
Essential Tools and Materials for Rubber Paver Installation
Successful rubber paver installation requires specific tools and materials that differ from traditional paver projects. Proper preparation includes gathering everything needed before starting, as interruptions during installation can affect adhesive curing and paver alignment.
The essential tool list includes measuring tools for accurate layout: 100-foot tape measure, chalk line for marking straight lines, framing square for checking corners, and a laser level or water level for verifying surface flatness. Layout mistakes compound quickly with pavers, so invest time in accurate initial measurements.
For surface preparation, you'll need a pressure washer or stiff brush for concrete cleaning, concrete crack filler for any existing damage, and a moisture meter to verify concrete readiness. A shop vacuum helps remove debris from cleaned surfaces before adhesive application.
Installation tools include a notched trowel for adhesive application, rubber mallet for paver adjustment, and knee pads for comfort during extended kneeling. A utility knife with replacement blades handles cutting pavers to fit around obstacles, while a straightedge guides clean cuts.
Rubber paver adhesive selection significantly impacts installation success and long-term performance. From our experience supplying commercial installations, polyurethane adhesives consistently outperform other options in high-traffic applications and temperature variations. Polyurethane adhesives provide superior flexibility and bonding strength for rubber paver applications, accommodating the natural expansion and contraction of both rubber and concrete substrates.
Avoid using construction adhesive or mastic designed for other applications, as these lack the flexibility needed for rubber paver installations. The adhesive must maintain bond strength through temperature cycles while allowing slight movement without cracking or losing adhesion.
Calculate adhesive requirements based on coverage rates specified by the manufacturer, typically ranging from 150 to 200 square feet per gallon depending on concrete texture and trowel notch size. Order 10-15% extra adhesive to account for waste and ensure consistent coverage throughout the project.
Safety equipment protects both health and project quality. Nitrile gloves prevent skin contact with adhesives and allow better grip on pavers. Safety glasses protect against debris during concrete preparation, while a dust mask or respirator prevents inhalation of concrete dust and adhesive fumes. Knee pads reduce fatigue and prevent injury during extended installation work.
For drainage considerations around concrete perimeters, gather materials for proper water management. For concrete installations, dig a 1-foot deep trench around the concrete perimeter and cover with crushed stone sloped away from buildings for drainage. You'll need a trenching shovel, crushed stone (3/8-inch to 3/4-inch diameter), and landscape fabric to prevent soil migration into the stone.
Climate control tools become important for adhesive application timing. A digital thermometer and humidity gauge help determine optimal installation conditions, as most adhesives require temperatures between 50-80°F and relative humidity below 85% for proper curing.
This complete rubber paver installation guide approach to tool selection ensures you're prepared for every step of the process without multiple trips to supply stores that could disrupt installation timing and adhesive working life.
Preparing Your Concrete Surface for Rubber Paver Installation
Concrete surface preparation determines the success of your entire rubber paver installation. Poor preparation leads to adhesive failure, uneven surfaces, and premature paver movement that compromises both appearance and safety.
New concrete requires adequate curing time before paver installation begins. Newly poured concrete requires a 4-week curing period before rubber paver installation can begin. This curing time allows the concrete to reach sufficient strength and reduces moisture content to acceptable levels for adhesive bonding.
Attempting installation before proper curing can result in poor adhesive bonding, trapped moisture that leads to mold growth, and potential concrete surface damage from premature loading. Even after the 4-week minimum, test concrete hardness by scratching the surface with a nail - properly cured concrete should show minimal marking.
Moisture content testing represents the most critical preparation step for existing concrete surfaces. Concrete must achieve moisture levels below manufacturer specifications before adhesive application, often requiring extended drying periods in humid conditions. Most adhesive manufacturers require concrete moisture content below 3-4 pounds per 1,000 square feet per 24 hours.
Moisture content testing involves placing plastic sheets over concrete sections, sealing the edges with tape, and checking for condensation after 24 hours. Visible condensation indicates excessive moisture that will prevent proper adhesive bonding. Moisture content testing of existing concrete is critical to prevent adhesive failure that could compromise the entire installation.
Surface cleaning removes contaminants that interfere with adhesive bonding. Start with a thorough pressure washing using 2,500-3,000 PSI pressure to remove dirt, oil stains, existing sealers, and loose concrete particles. Allow 24-48 hours drying time after pressure washing before proceeding with installation.
For oil stains that resist pressure washing, use a commercial degreaser designed for concrete surfaces. Apply the degreaser according to manufacturer instructions, scrub with a stiff brush, then pressure wash again. Stubborn stains may require multiple treatment cycles, but thorough removal prevents adhesive failure in those areas.
Crack repair maintains surface integrity and prevents paver movement over time. Fill hairline cracks (less than 1/8 inch wide) with concrete crack sealer applied according to manufacturer specifications. Larger cracks require concrete patching compound that can be feathered smooth with surrounding concrete.
For cracks wider than 1/4 inch or any moving cracks that indicate structural issues, consult with a concrete professional before proceeding with paver installation. Installing pavers over structural concrete problems creates safety hazards and will likely result in installation failure.
Surface leveling ensures even paver installation and proper drainage. Use a 4-foot level or laser level to identify high and low spots across the concrete surface. High spots should be ground down using a concrete grinder, while low spots require patching compound to bring them level with surrounding areas.
Pay special attention to areas where water might pond, as standing water under rubber pavers can cause adhesive failure and create slip hazards. The concrete surface should slope away from buildings at a minimum rate of 1/4 inch per foot to ensure proper drainage.
Drainage considerations become critical for solid concrete bases. Solid sub-bases such as concrete require perforated drains to prevent moisture build-up under rubber pavers. This might involve installing perimeter drains or adding drainage channels in areas prone to water accumulation.
The perimeter drainage system prevents water from getting trapped under the pavers, which could cause adhesive failure or create conditions for mold growth. Install this drainage system before beginning paver installation, ensuring all components are properly sloped and connected to appropriate drainage outlets.
Final surface preparation includes one last cleaning with a shop vacuum to remove all dust and debris from the concrete surface. The concrete should be completely clean, dry, and free of any contaminants when adhesive application begins. Any remaining debris will create weak spots in the adhesive bond that can lead to paver failure over time.
Step-by-Step Rubber Paver Installation Guide
The actual installation process for install rubber pavers over concrete requires systematic execution of each step to achieve professional results. Proper sequencing ensures optimal adhesive performance and paver alignment throughout the project.
Begin with paver acclimation, which prevents dimensional changes during installation. Rubber pavers should acclimate to local conditions for a minimum of 1 full day before installation to prevent last-minute expansion or shrinking. Store pavers in the installation area, spread out rather than stacked, to ensure even temperature and humidity exposure.
During acclimation, inspect each paver for defects, damage, or significant color variations. Separate any damaged pieces for cutting or return to supplier, and distribute pavers with slight color variations throughout the installation area to create a natural, blended appearance rather than obvious color blocks.
Layout planning determines the final appearance and efficiency of your installation. Start by measuring the concrete area and calculating the number of whole pavers that fit in each direction. Position the layout to minimize cutting and create balanced borders on opposite sides of the installation.
Mark reference lines using chalk line to guide initial paver placement. For rectangular areas, establish square corners using the 3-4-5 triangle method: measure 3 feet along one edge, 4 feet along the perpendicular edge, and verify the diagonal distance measures exactly 5 feet. Square layouts prevent compound errors that become obvious as installation progresses.
Consider starting the installation from the most visible corner or edge, working toward less visible areas where cut pieces will be placed. This approach ensures whole pavers are positioned in prominent areas while partial pavers are located where they're less noticeable.
Temperature considerations affect both adhesive performance and installation timing. Most adhesive manufacturers specify application temperatures between 50-80°F with relative humidity below 85%. Temperature variations require adhesive application for outdoor rubber paver installations to prevent movement and shifting.
Plan installation timing to work within optimal temperature ranges, typically during moderate weather conditions. Avoid installation during temperature extremes, high humidity, or precipitation that could affect adhesive curing.
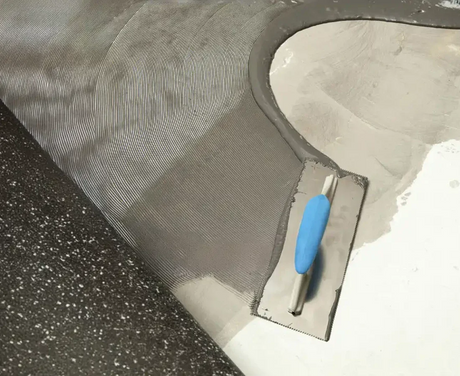
Adhesive application requires systematic coverage to ensure consistent bonding. Use a notched trowel with the notch size specified by the adhesive manufacturer, typically 3/16-inch V-notch or 1/4-inch square notch for rubber paver applications. Apply adhesive in sections sized to accommodate 30-45 minutes of working time.
Hold the trowel at a 45-degree angle to the concrete surface and pull in straight, overlapping passes to create uniform adhesive ridges. The ridges provide proper adhesive volume and allow air escape during paver placement. Avoid overworking the adhesive, which can reduce bonding strength.
Apply adhesive only to areas you can complete within the working time. If adhesive begins to skin over before paver placement, remove it and apply fresh material. Attempting to install pavers over skinned adhesive results in poor bonding and potential failure.
Paver placement begins with positioning the first piece according to your layout marks. Place each paver straight down onto the adhesive rather than sliding it into position, which can disturb the adhesive ridges and create air pockets. Once positioned, press firmly across the entire paver surface to ensure complete contact with adhesive.
For interlocking rubber pavers installation, align the tabs and slots carefully before pressing down. The interlocking mechanism should engage smoothly without forcing pieces together. If pieces don't fit easily, check for debris in the interlocking channels or slight dimensional variations that require minor adjustments.
Use a rubber mallet to make final adjustments to paver position and ensure complete seating in the adhesive. Work systematically across the installation area, placing pavers in a pattern that maintains proper alignment and prevents compound errors.
Check alignment frequently using a straightedge or string line across multiple pavers. Small alignment errors early in installation multiply as work progresses, eventually creating noticeable irregularities that require removing and reinstalling pavers.
Laying rubber pavers around obstacles or irregular shapes requires careful measuring and cutting. Mark cut lines on pavers using a straightedge and permanent marker, then cut with a sharp utility knife using multiple light passes rather than attempting to cut through in a single pass.
For complex cuts around pipes, posts, or curved edges, create a template using cardboard or paper to verify the fit before marking the paver. Transfer the template pattern to the paver, allowing for slight gaps around fixed objects to accommodate thermal expansion.
Install cut pieces after completing all whole paver installations. This sequence prevents disruption of the main installation pattern and ensures cut pieces fit properly into their designated spaces.
Throughout installation, maintain consistent pressure and contact between pavers and adhesive. Walk across installed sections periodically to identify any pavers that haven't seated completely, pressing down on high spots to ensure full adhesive contact.
The systematic approach to how to install rubber pavers creates professional results that perform well long-term while minimizing installation problems that could compromise the project success.
Finishing Touches and Edge Solutions
Professional-quality rubber paver installations require attention to edges, transitions, and finishing details that complete the project and ensure long-term performance. These final steps transform a functional surface into a polished outdoor living space.
Perimeter treatment options depend on the specific application and surrounding surfaces. For installations that meet existing walkways, patios, or building entrances, reducer strips along perimeters create safe transitions and prevent tripping hazards between surface levels. These strips provide a gradual slope between different surface heights rather than abrupt edges that can catch feet or equipment.
Reducer strips are available in various profiles to accommodate different height differences. Select strips that match or complement the rubber paver color and texture for visual continuity. Install reducer strips using the same adhesive system as the pavers, ensuring complete bonding along the entire length.
For perimeters that don't require reducer strips, consider exposed edges that showcase the paver thickness. Clean, straight edges create a more contemporary appearance but require precise cutting and careful finishing to prevent fraying or cracking over time.
Edge sealing protects the perimeter from moisture infiltration that could undermine the adhesive bond or create conditions for mold growth. Apply a bead of polyurethane sealant along the perimeter where pavers meet other surfaces, tooling the sealant smooth for a professional appearance.
Use sealant that matches the paver color or select clear sealant for invisible protection. Ensure compatibility between the sealant and both the rubber pavers and adjacent surface materials to prevent chemical reactions that could cause discoloration or bonding failure.
Expansion joint treatment becomes critical for large installations or areas subject to significant temperature variations. Rubber pavers expand and contract with temperature changes, and installations over 1,000 square feet typically require expansion joints to accommodate this movement without buckling or separation.
Install expansion joints at 20-foot intervals in both directions for large areas, using flexible sealant that can accommodate movement while maintaining weather protection. The joints should extend completely through the paver installation to the concrete substrate below.
For installations that span existing concrete control joints, maintain these joints in the rubber paver installation to prevent stress concentration that could crack the concrete or cause paver separation. Mark existing concrete joints during layout planning to ensure proper alignment.
Drainage verification ensures water flows properly across the completed installation. Test drainage by applying water to various areas of the installation and confirming that water flows toward designated drainage points without ponding. Standing water indicates low spots that require attention before the adhesive fully cures.
Make any necessary adjustments to drainage while the adhesive remains workable. After full curing, drainage modifications become much more difficult and may require removing and reinstalling pavers in affected areas.
Laying rubber pavers includes final inspection procedures that identify any issues requiring correction before the project is complete. Check all paver edges for proper alignment, verify consistent spacing between pavers, and confirm that all cut pieces fit properly without gaps or overlaps.
Examine the entire installation for pavers that haven't seated completely in the adhesive, indicated by slightly higher elevation than surrounding pieces. Use a rubber mallet to press these pavers fully into the adhesive while it remains workable.
Clean any adhesive that has squeezed up between pavers or onto paver surfaces using the cleaner recommended by the adhesive manufacturer. Remove adhesive completely while it's still fresh, as cured adhesive requires mechanical removal that can damage paver surfaces.
Initial curing and setting time varies by adhesive type and environmental conditions but typically ranges from 24 to 48 hours for foot traffic and 72 hours for normal use. Protect the installation from foot traffic, precipitation, and temperature extremes during this initial curing period.
Post-installation protection includes covering the installation with plastic sheeting if rain threatens before full curing. Avoid walking on the installation until the adhesive manufacturer's specified cure time has elapsed, as premature loading can disturb the bond and create weak spots.
Maintenance and Troubleshooting Your Rubber Paver Installation
Proper maintenance extends the life of your rubber paver installation while preserving its appearance and safety characteristics. Understanding routine care requirements and common problems helps maintain optimal performance for decades.
Regular cleaning represents the most important maintenance task for rubber paver installations. Sweep or blow debris from the surface weekly to prevent accumulation of dirt and organic matter that can stain pavers or create slip hazards when wet. For deeper cleaning, use a pressure washer on low setting (1,500 PSI maximum) with plain water or mild detergent.
Avoid harsh chemicals, petroleum-based cleaners, or solvents that can damage rubber compounds or cause discoloration. Simple soap and water effectively remove most stains and dirt accumulation without affecting paver integrity.
Our commercial clients report that properly installed rubber flooring requires minimal maintenance compared to traditional hard surfaces, making it cost-effective long-term. Annual maintenance for rubber flooring averages just $0.30 to $0.50 per square foot, significantly less than concrete sealing, stone re-pointing, or wood deck refinishing.
Seasonal maintenance tasks include inspecting drainage systems to ensure proper water flow, checking perimeter sealant for cracks or separation, and examining individual pavers for signs of wear or damage. Fall maintenance should include removing leaves and organic debris that could stain pavers or create slippery conditions.
Winter protection involves using ice melt products compatible with rubber surfaces. Avoid rock salt or calcium chloride-based products that can cause rubber degradation over time. Instead, use sand for traction or ice melts specifically approved for rubber surfaces.
Snow removal should use plastic shovels or snow blowers rather than metal tools that could damage paver surfaces. The cushioned surface of rubber pavers provides better traction than concrete or stone even in winter conditions, reducing ice formation in many situations.
Common installation problems and their solutions help address issues that may develop over time. Loose pavers typically result from adhesive failure due to moisture exposure, inadequate surface preparation, or installation outside recommended temperature ranges. Individual loose pavers can be removed, the concrete cleaned, and the paver reinstalled with fresh adhesive.
Edge lifting often occurs when perimeter pavers aren't adequately secured or when moisture infiltrates the installation. Address edge lifting immediately by lifting affected pavers, cleaning the area thoroughly, and reinstalling with additional adhesive and improved edge sealing.
Staining problems depend on the stain source and how quickly treatment begins. Oil stains respond well to degreasing agents designed for rubber surfaces, while organic stains from leaves or berries often fade with time and regular cleaning. For persistent stains, consult with the paver manufacturer for approved cleaning methods.
Color fading can occur with prolonged UV exposure, particularly with darker colored pavers. While quality pavers include UV stabilizers, some color change over time is normal and usually creates a uniform, weathered appearance rather than unsightly patches.
When to call professionals versus attempting DIY fixes depends on the scope and complexity of the problem. Individual paver replacement, minor edge repairs, and routine maintenance tasks are well within DIY capabilities. However, widespread adhesive failure, drainage problems, or issues affecting large sections of the installation may require professional assessment.
Professional installation crews are required for complex projects involving heavy-duty rubber rolls and precise adhesive application, and the same expertise applies to major repair projects that affect the integrity of large installation areas.
Long-term performance expectations for quality rubber paver installations include 15-20 years of service life with proper maintenance. The pavers themselves may last longer, but adhesive systems typically require evaluation and potential renewal at 15-20 year intervals depending on environmental exposure and use intensity.
Cost-effective maintenance strategies focus on prevention rather than repair. Regular inspection and prompt attention to minor issues prevent problems from developing into major repairs that require professional intervention. Maintaining proper drainage, prompt cleaning of spills, and protecting the installation from damage during other outdoor projects preserve the investment for maximum return.
Documentation of installation date, materials used, and maintenance performed helps track performance and plan future maintenance needs. Keep records of adhesive type, paver manufacturer, and any warranty information for reference if problems develop or when planning long-term maintenance.
Frequently Asked Questions
1. Can you install rubber pavers directly on concrete without adhesive?
For permanent installations, adhesive is strongly recommended to prevent movement and ensure long-term stability. While 1-3/4 inch interlocking pavers can be installed without adhesive, they may shift over time and don't provide the same level of performance as bonded installations.
2. How long does rubber paver installation take?
A typical 200 square foot patio installation takes 1-2 days for experienced DIYers, including surface preparation and acclimation time. Larger projects or complex layouts with multiple cuts may require additional time, while professional crews can often complete installations faster but require scheduling and higher costs.
3. What's the cost difference between DIY and professional installation?
DIY installation costs typically range from $4-8 per square foot including materials, while professional installation ranges from $8-15 per square foot. The significant labor savings make DIY attractive for homeowners with moderate skills and adequate time for proper preparation and installation.
4. How do rubber pavers perform in extreme weather conditions?
Quality rubber pavers handle temperature extremes well, remaining flexible in cold conditions and stable in heat. They provide better traction than hard surfaces in wet conditions and don't crack from freeze-thaw cycles like concrete or stone, with UV stabilizers preventing excessive fading in high sun exposure areas.
5. Can rubber pavers be removed and reinstalled if needed?
Pavers installed with adhesive are difficult to remove without damage and typically can't be reinstalled successfully. Interlocking pavers installed without adhesive can be removed and reinstalled, making them suitable for temporary applications or when future changes are anticipated.
6. What's the expected lifespan of rubber pavers over concrete?
With proper installation and maintenance, quality rubber pavers can perform well for 15-20 years. The concrete substrate typically lasts much longer, so future renovations usually involve replacing just the pavers rather than the entire system, making this a cost-effective long-term investment.
7. Do rubber pavers require special winter care and maintenance?
Winter maintenance involves using compatible ice melt products and avoiding metal snow removal tools that could damage surfaces. The natural traction of rubber surfaces reduces ice formation compared to smooth concrete, but some winter protection may be needed in extreme climates with proper ice melt selection.
8. How do I calculate the materials needed for my project?
Measure the concrete area in square feet and add 5-10% for cuts and waste allowance. For standard 7-7/8" x 6-3/8" pavers, approximately 36 pavers cover 10 square feet, and calculate adhesive needs based on manufacturer coverage rates, typically 150-200 square feet per gallon depending on application method.
Transform Your Concrete Space with Professional-Grade Rubber Pavers
Installing rubber pavers over concrete transforms cold, unforgiving surfaces into comfortable, safe outdoor spaces that enhance both functionality and enjoyment of your property. The systematic approach outlined in this guide enables confident DIY installation while ensuring professional-quality results that last for decades.
The key to successful how to install rubber pavers lies in proper preparation, quality materials, and attention to detail during each installation phase. From selecting appropriate paver thickness and adhesive systems to executing proper surface preparation and systematic installation techniques, each step contributes to the overall success of your project.
The achievability of DIY installation makes this an attractive option for homeowners seeking to improve their outdoor spaces without the expense of professional crews. With basic tools, moderate skills, and careful attention to manufacturer specifications, most concrete surfaces can be successfully transformed into comfortable rubber paver patios, walkways, or recreational areas.
Long-term value justifies the initial investment through reduced maintenance requirements, improved safety characteristics, and enhanced comfort compared to bare concrete. The 15-20 year service life of quality installations provides excellent return on investment while creating outdoor spaces that encourage more frequent use and enjoyment.
At Blue Sky Fitness Supply, we understand the importance of quality flooring solutions that perform reliably in demanding applications. Our commercial-grade rubber flooring products bring the same durability and performance standards used in professional facilities to residential applications. Whether you're planning a small patio project or large-scale outdoor renovation, our experienced team can help you select the right materials and provide the technical guidance needed for successful installation. Visit our rubber flooring collection to explore professional-grade options that deliver exceptional performance and long-term value for your concrete transformation project.